Composer
Composer
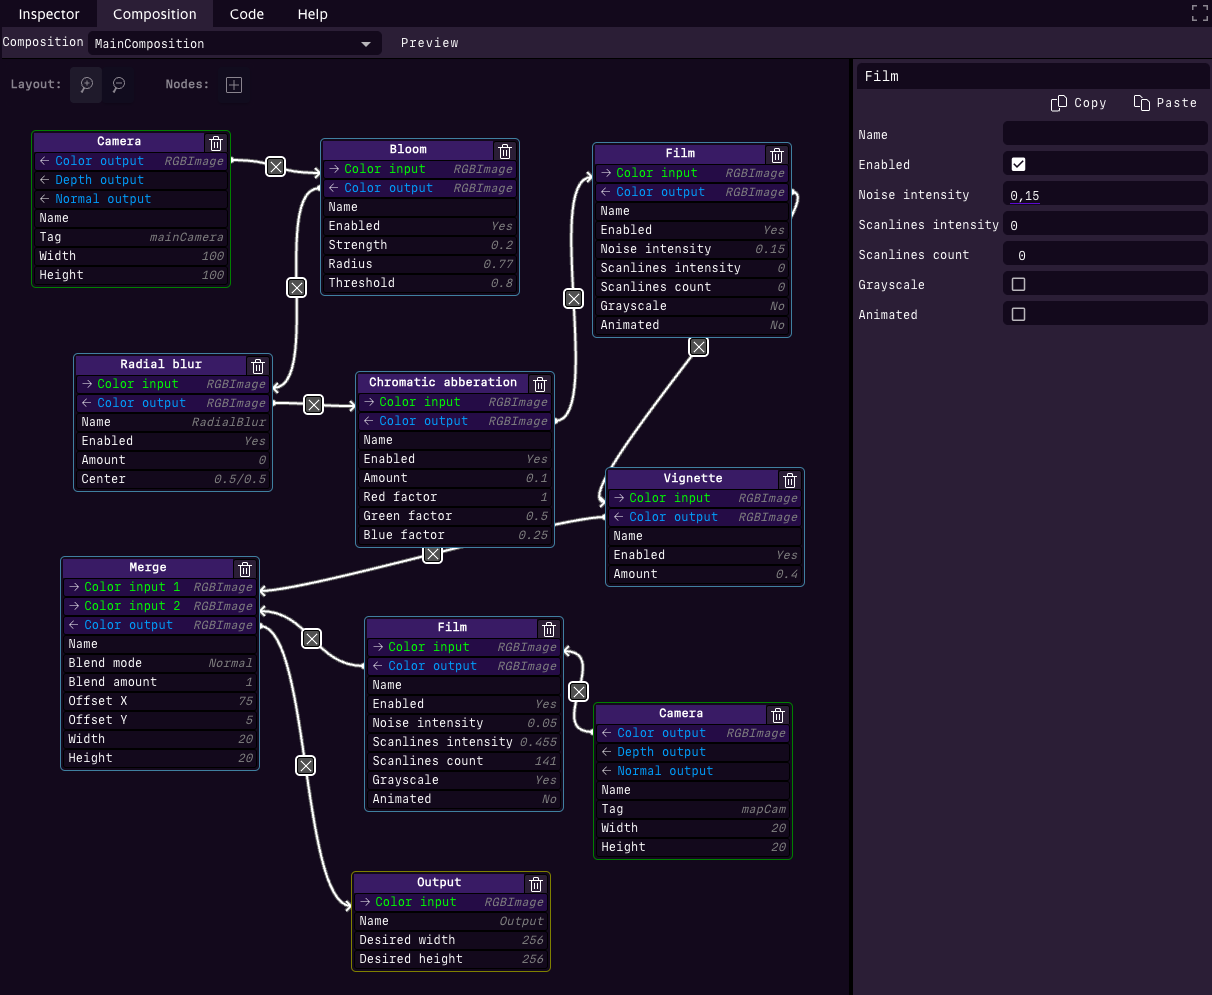
The Composer is where post-processing effects are applied to enhance the final rendered output. It allows you to configure a series of processing nodes, an output node, and one or more camera nodes.
At minimum, a composition requires:
A camera node: Captures the view from a camera in your scene.
An output node: Displays the final processed image.
The camera’s color output slot must be connected to the output node’s color input slot. This basic setup renders the camera view on screen without any post-processing. Additional nodes can be inserted to apply effects, and multiple camera nodes can render additional views, such as UI overlays, minimaps, or backview mirrors.
Composer and Multiple Scenes
When multiple scenes are loaded, only camera nodes from the primary scene are considered by the Composer. Camera setups from secondary scenes are ignored during rendering.
Available Nodes
The following table lists the available nodes and their purposes:
Node |
Description |
|---|---|
Adjust |
Provides controls for tweaking brightness, contrast, saturation, and other image properties. |
Bloom |
Adds a glowing effect to bright areas, simulating light scattering and creating a soft, dreamy appearance. |
Blur |
Applies a general blur effect to soften the image, often used for artistic or depth-based effects. |
Camera |
Renders a camera view from your scene. |
Chromatic Aberration |
Splits colors slightly at the edges of objects, mimicking lens imperfections for a more realistic or stylized look. |
Color Depth |
Reduces the number of color levels per channel, simulating lower-bit-depth visuals for artistic or technical purposes. |
Depth of Field |
Simulates camera focus by blurring objects outside the focal plane, enhancing realism or guiding the user’s sattention. |
Film |
Simulates film grain and scanlines to give a cinematic or television look. |
FXAA |
Fast Approximate Anti-Aliasing algorithm reduces jagged edges on objects for smoother visuals without a high performance cost. |
Glitch |
Creates a digital distortion effect, simulating video signal issues for dramatic or futuristic aesthetics. |
God Rays |
Simulates beams of light scattering creating a volumetric glow around bright areas. |
Kawase Blur |
Produces a fast and efficient blur effect. The Kawase Blur is ideal for creating smooth and visually appealing softening effects, often used in bloom, depth of field, or UI background. |
Merge |
Combines multiple image inputs into a single output, often used for layering effects or compositing views. |
Outline |
Adds a contour around objects, enhancing their visibility and separation from the background. |
Output |
Represents the final output node, which receives the processed image. Only one output node is allowed per composition. |
Pixelation |
Reduces the image resolution, creating a pixelated effect often used for retro-style visuals. |
Radial Blur |
Creates a blur effect radiating outward from a point, useful for simulating speed or focus shifts. |
Scanline |
Adds horizontal lines to simulate old CRT screens, evoking a retro or analog atmosphere. |
Sepia |
Applies a warm brown tone to an image, emulating the look of vintage photographs. |
Shockwave |
Creates expanding circular distortion waves from a defined center point, simulating visual effects like explosions, impacts, or energy pulses. |
SSAO |
Screen Space Ambient Occlusion enhances realism by simulating shadowing in crevices and corners where light would naturally be occluded. |
Texture |
Allows applying a custom texture to the composition, often used for overlays or additional layering visual elements. |
Tone Mapping |
Adjusts color tones and luminance, often used to map HDR content to standard displays. |
Vignette |
Darkens the edges of the screen, drawing attention to the center of the frame for a more focused and dramatic effect. |
Available Blending modes
Blending modes determine how colors from different composition nodes interact with each other. They are essential in creating engaging compositing effects. Below is a list of available blending modes and their descriptions:
Blending Mode |
Description |
|---|---|
Add |
Adds the color values together, producing a brighter result. |
Alpha |
Blends colors based on the alpha value of the new color. |
Average |
Computes the average of the new color and the base color. |
Color |
Converts the colors to HSL colorspace and blends them based on color information. |
Color Burn |
Darkens the base color to reflect the blend color, increasing contrast. |
Color Dodge |
Brightens the base color to reflect the blend color, reducing contrast. |
Darken |
Retains the darker of the two colors. |
Difference |
Subtracts the base color from the blend color, creating a contrast effect. |
Divide |
Divides the base color by the blend color, producing a lightening effect. |
Exclusion |
Similar to Difference blending but with lower contrast. |
Hard Light |
Applies a combination of Multiply and Screen blending depending on the brightness of the blend color. |
Hard Mix |
Reduces each color channel to either full intensity or zero, creating a posterized effect. |
Hue |
Converts the colors to HSL colorspace and blends them based on hue. |
Invert |
Inverts the base color by applying the opposite color. |
Invert RGB |
Multiplies the new color with the inverted base color. |
Lighten |
Retains the lighter of the two colors. |
Linear Burn |
Darkens the base color by subtracting the blend color. |
Linear Dodge |
Similar to Add blending but clamps the result to a maximum value of 1. |
Linear Light |
Uses a combination of Linear Dodge and Linear Burn to create high contrast results. |
Luminosity |
Converts the colors to HSL colorspace and blends them based on luminosity. |
Multiply |
Multiplies the base and blend colors, resulting in a darker image. |
Negation |
Negates the base color using the blend color, producing unique contrast effects. |
Normal |
Directly replaces the base color with the blend color. |
Overlay |
Combines Multiply and Screen blending for a high contrast effect. |
Pin Light |
Replaces colors depending on the brightness of the blend color. |
Reflect |
Creates a reflective lighting effect based on the blend color. |
Saturation |
Converts the colors to HSL colorspace and blends them based on saturation. |
Screen |
Projects both colors onto a white screen, producing a brightening effect. |
Soft Light |
Similar to Overlay but produces a softer result. |
Set |
Directly sets the base color to the blend color. |
Src |
Overwrites the base color with the blend color while ignoring opacity. |
Subtract |
Subtracts the blend color from the base color, producing a darkening effect. |
Vivid Light |
Uses a combination of Color Dodge and Color Burn to produce an extreme contrast effect. |
Adjust
The Adjust Node allows fine-tuning of brightness, contrast, hue and saturation within the rendering pipeline. This effect is useful for enhancing visibility, achieving artistic effects, or balancing the overall image tonality.
Field |
Description |
|---|---|
Name |
A String attribute specifying the name of the node for reference. |
Enabled |
A Boolean attribute that toggles the effect on or off. |
Brightness |
A Float attribute that adjusts the image’s brightness. The value ranges from -1 (completely dark) to 1 (maximum brightness). A value of 0 gives no change in brightness. |
Contrast |
A Float attribute that controls the image contrast. The value ranges from -1 (negative contrast) to 1 (high contrast). A value of 0 gives no contrast. |
Hue |
A Float attribute that adjusts the color tint of the image by rotating its hues along the color wheel. The value ranges from 0 (no color shift) to 6.28 (full rotation, returning to original hue). |
Saturation |
A Float attribute that controls the intensity of the contrast. The value ranges from -1 (completely desaturated) to 1 (strong vibrant colors). |
Input |
Description |
|---|---|
Color Input |
An RGBImage input that receives the image to be processed by the Adjust node. |
Output |
Description |
|---|---|
Color Output |
An RGBImage output providing the Adjusted image result. |
Bloom
The Bloom Node enhances bright areas in the image by adding a glow effect, simulating light scattering. This effect is useful for creating cinematic visuals and emphasizing high-intensity light sources.
Field |
Description |
|---|---|
Name |
A String attribute specifying the name of the node for reference. |
Enabled |
A Boolean attribute that toggles the effect on or off. |
Strength |
A Float attribute that controls the intensity of the bloom effect. The value ranges from 0 (no effect) to 10 (maximum intensity), with a default of 1.5. |
Radius |
A Float attribute defining the spread of the bloom effect. The value ranges from 0 (localized) to 1 (widest spread), with a default of 0.4. |
Threshold |
A Float attribute that sets the minimum brightness level required for bloom to apply. The value ranges from 0 (applies to all brightness levels) to 1 (applies only to the brightest areas), with a default of 0.8. |
Input |
Description |
|---|---|
Color Input |
An RGBImage input that receives the image to be processed by the Bloom node. |
Output |
Description |
|---|---|
Color Output |
An RGBImage output providing the image result. |
Blur
The Blur Node applies a smoothing effect to the image, reducing sharp details and creating a soft-focus look. This effect is useful for depth simulation, motion effects, or aesthetic softening.
Field |
Description |
|---|---|
Name |
A String attribute specifying the name of the node for reference. |
Enabled |
A Boolean attribute that toggles the effect on or off. |
Amount |
A Float attribute that controls the intensity of the blur effect. The value ranges from 0 (no effect) to 10 (maximum blur), with a default of 1. |
Input |
Description |
|---|---|
Color Input |
An RGBImage input that receives the image to be processed by the Blur algorithm. |
Output |
Description |
|---|---|
Color Output |
An RGBImage output providing the blurred image result. |
Camera
The Camera Node serves as the primary source of scene rendering, capturing the visual output and depth information required for further processing. This node outputs color, depth, depth-comparison, normal data and camera information making it essential for rendering and post-processing effects.
Field |
Description |
|---|---|
Name |
A String attribute specifying the name of the node for reference. |
Tag |
A String attribute defining the tag of the camera to be used for rendering. |
Layers |
A String attribute defining the layers the camera to be used for rendering. It will overwrite the settings in the camera object. |
Width |
A Float attribute specifying the rendering width as a percentage. The default value is 100%. |
Height |
A Float attribute specifying the rendering height as a percentage. The default value is 100%. |
Output |
Description |
|---|---|
Color Output |
An RGBImage output containing the rendered color information. |
Depth Output |
A GrayImage output representing the depth information of the scene. |
Depth Comparison Output |
A GrayImage output used for comparing depth values in post-processing. |
Normal Output |
An RGBImage output containing the normal vector information of the scene. |
Camera Output |
An Attribute output containing camera-related properties and metadata. |
Chromatic Aberration
The Chromatic Aberration Node simulates color fringing effects that occur due to lens imperfections, separating the red, green, and blue color channels to create a subtle distortion. This effect can enhance realism or provide a stylistic visual distortion.
Field |
Description |
|---|---|
Name |
A String attribute specifying the name of the node for reference. |
Enabled |
A Boolean attribute that toggles the effect on or off. |
Amount |
A Float attribute controlling the intensity of the chromatic aberration effect. The value ranges from 0 (no effect) to 10 (maximum separation), with a default of 1. |
Red Factor |
A Float attribute determining the intensity of the red channel separation. The value ranges from 0 to 1, with a default of 1. |
Green Factor |
A Float attribute determining the intensity of the green channel separation. The value ranges from 0 to 1, with a default of 0.5. |
Blue Factor |
A Float attribute determining the intensity of the blue channel separation. The value ranges from 0 to 1, with a default of 0.25. |
Input |
Description |
|---|---|
Color Input |
An RGBImage input that receives the image to be processed by the Chromatic Abberation node. |
Output |
Description |
|---|---|
Color Output |
An RGBImage output providing the node result. |
Color Depth
The Color Depth Node adjusts the bit depth of an image, allowing control over the number of color levels per channel. This effect is useful for creating artistic styles or simulating limited-color hardware limitations.
Field |
Description |
|---|---|
Name |
A String attribute specifying the name of the node for reference. |
Enabled |
A Boolean attribute that toggles the effect on or off. |
Bit Depth |
An Integer attribute that sets the number of bits per color channel. The value ranges from 1 (minimum depth, highly posterized) to 32 (maximum depth, full color precision). |
Blending Mode |
An Enum attribute that determines how the adjusted color depth blends with the input image. Normal is the default blending mode. |
Blend Amount |
A Float attribute that controls the blending intensity of the effect. |
Input |
Description |
|---|---|
Color Input |
An RGBImage input that receives the image to be processed by the Color Depth node. |
Output |
Description |
|---|---|
Color Output |
An RGBImage output providing the image with the adjusted color depth. |
Depth of Field
The Depth of Field Effect simulates a camera’s focus, creating a realistic depth perception by blurring out-of-focus regions. This effect is ideal for cinematic rendering and directing the viewer’s attention to a specific area of the scene.
Field |
Description |
|---|---|
Name |
A String attribute specifying the name of the node for reference. |
World Focus Distance |
A Float attribute defining the distance from the camera at which objects appear in sharp focus. |
World Focus Range |
A Float attribute controlling the range around the focus distance where objects remain sharp. |
Focus Target |
A String a tag to an object to enable autofocus. If empty, the focus is given by World Focus Distance. If given, World Focus Distance is ignored and the focus is automatically computed to the target object. |
Kawase Blur Kernel Size |
An Integer attribute defining the kernel size of the blur applied to out-of-focus areas. See the Kawase Blur documentation for more information. |
Bokeh Scale |
A Float attribute adjusting the intensity of out-of-focus light artifacts, known as Bokeh. |
Resolution Scale |
A Float attribute adjusting the resolution of the effect to optimize performance. Lower values increase performance at the cost of precision. |
Enable Debug |
A Boolean attribute enabling debug mode for the Depth of Field effect, providing visual debugging tools. |
Input |
Description |
|---|---|
Color Input |
The primary color image to which the depth of field effect is applied. |
Depth Input |
The depth map used to calculate focus distances and blurring. |
Camera Input |
Provides camera parameters needed for depth calculations. |
Output |
Description |
|---|---|
Color Output |
An RGBImage output providing the node result. |
Film
The Film Node simulates classic film effects, including grain, scanlines, and optional grayscale rendering. It can be used to add a cinematic or vintage look to a scene.
Field |
Description |
|---|---|
Name |
A String attribute specifying the name of the node for reference. |
Enabled |
A Boolean attribute that toggles the effect on or off. |
Noise Intensity |
A Float attribute that controls the intensity of the noise or grain effect. The value ranges from 0 (no noise) to 1 (maximum noise), with a default of 0.05. |
Scanlines Intensity |
A Float attribute defining the intensity of scanlines. The value ranges from 0 (no scanlines) to 1 (strong scanlines), with a default of 0. |
Scanlines Count |
An Integer attribute specifying the number of scanlines in the effect. The value ranges from 0 to 1000, with a default of 0. |
Grayscale |
A Boolean attribute that, when enabled, applies a grayscale filter to the effect. |
Animated |
A Boolean attribute that, when enabled, animates the noise and scanline effects over time. |
Input |
Description |
|---|---|
Color Input |
An RGBImage input that receives the image to be processed by the Film node. |
Output |
Description |
|---|---|
Color Output |
An RGBImage output providing the node result. |
FXAA
The FXAA (Fast Approximate Anti-Aliasing) Node applies an anti-aliasing effect to smooth out jagged edges in rendered images, improving visual quality without a significant performance cost.
Field |
Description |
|---|---|
Name |
A String attribute specifying the name of the node for reference. |
Enabled |
A Boolean attribute that toggles the effect on or off. |
Input |
Description |
|---|---|
Color Input |
An RGBImage input that receives the image to be processed by the FXAA algorithm. |
Output |
Description |
|---|---|
Color Output |
An RGBImage output providing the anti-aliased image result. |
Glitch
The Glitch Effect is a temporal visual distorsion. It simulates an erratic behaviour made of digital artifcats.
Field |
Description |
|---|---|
Name |
A String attribute specifying the name of the node for reference. |
Strength |
A Vector2d attribute defining the maximum and minimum strength of the glitch effect. |
Columns |
A float attribute controlling the column distortion intensity. Range: 0 to 1. |
Delay |
A Vector2d attribute specifying the duration interval of the delay for the glitch effect. |
Duration |
A Vector2d attribute specifying the duration interval of the glitch effect. |
Input |
Description |
|---|---|
Color Input |
An RGBImage input that receives the image to be processed by the Glitch node. |
Output |
Description |
|---|---|
Color Output |
An RGBImage output providing the node result. |
God Rays
The God Rays Effect simulates light beams streaming through a medium, creating dramatic shafts of light reminiscent of sunbeams. The node enables you to control various parameters such as density, decay, and exposure to achieve a visually appealing and cinematic effect.
Field |
Description |
|---|---|
Name |
A String attribute specifying the name of the node for reference. |
Enabled |
A Boolean attribute to toggle the God Rays effect on or off. |
Light Source |
A String attribute that identifies the tag of the light source (e.g. sun) that emits the rays. This object must be a light for the node to work correctly. |
Size |
A Float attribute controlling size of the sun. Minimum value is 0.01 with a default of 1. |
Density |
A Float attribute controlling the concentration of rays. Minimum value is 0.01 with a default of 1. |
Decay |
A Float attribute determining how quickly the rays fade over distance. Minimum value is 0.01 with a default of 1. |
Weight |
A Float attribute influencing the overall strength of the rays. Minimum value is 0.01 with a default of 1. |
Exposure |
A Float attribute adjusting the brightness of the effect. Minimum value is 0.01 with a default of 1. |
Maximum Intensity |
A Float attribute setting a cap on the intensity of the rays. Minimum value is 0.01 with a default of 1. |
Samples |
An Integer attribute controls how smooth and detailed the light rays look by deciding how many times the shader checks for light between each pixel and the light source. Default is 60. |
Blur Rays |
A Boolean attribute to enable additional blurring for a smoother effect. |
Kernel Size |
An Integer attribute defining the number of blur iterations applied when blurring is enabled. Higher number yields to better results at a higher computational cost. Range: 0 to 10, default is 2. |
Resolution Scale |
A Float attribute that scales the resolution of the effect. Range: 0 to 1, with a default of 0.50. |
Blending Mode |
An Enum attribute for selecting the compositing mode. Options include Add, Alpha, Average, Color, Color Burn, Color Dodge, Darken, Difference, Divide, Exclusion, Hard Light, Hard Mix, Hue, Invert, Invert RGB, Lighten, Linear Burn, Linear Dodge, Linear Light, Luminosity, Multiply, Negation, Normal, Overlay, Pin Light, Reflect, Saturation, Screen, Soft Light, Set, Src, Subtract, and Vivid Light. Default is Screen. |
Opacity |
A Float attribute adjusting the transparency of the effect. Range: 0 to 1, with a default of 0.25. |
Input |
Description |
|---|---|
Color Input |
An RGBImage input that receives the image to be processed by the God Rays node. |
Depth Input |
A GrayImage input providing depth information crucial for calculating light scattering. |
Camera Input |
An Attribute input that supplies camera parameters for accurate ray projection. |
Output |
Description |
|---|---|
Color Output |
An RGBImage output providing the final image with the God Rays effect applied on. |
Kawase Blur
The Kawase Blur Effect is a high-performance, separable blur technique used to create smooth and aesthetically pleasing visuals. This effect is commonly used in scenarios such as bloom, depth of field, and soft UI backgrounds. It’s performance cost is significantly smaller than other blur algorithms such as the Gaussian Blur.
Field |
Description |
|---|---|
Name |
A String attribute specifying the name of the node for reference. |
Enabled |
A Boolean attribute to enable or disable the Kawase Blur effect. |
Kernel Size |
An Integer attribute controlling the size of the kawase blur kernel. Higher values yields a better blur effect at higher computational cost. |
Resolution Scale |
A Float attribute adjusting the strength of the blur effect. |
Input |
Description |
|---|---|
Color Input |
An RGBImage input that receives the image to be processed by the Kawase Blur algorithm. |
Output |
Description |
|---|---|
Color Output |
An RGBImage output providing the node result. |
Merge
The Merge Node combines two images using a variety of blending modes and transformations. It supports multiple compositing techniques, allowing flexible control over how the images are layered together.
Field |
Description |
|---|---|
Name |
A String attribute specifying the name of the node for reference. |
Enabled |
A Boolean attribute to enable or disable the node. |
Blending Mode |
An Enum attribute that determines the blending mode used to combine the two images. Available options include Add, Alpha, Average, Color, Color Burn, Color Dodge, Darken, Difference, Divide, Exclusion, Hard Light, Hard Mix, Hue, Invert, Invert RGB, Lighten, Linear Burn, Linear Dodge, Linear Light, Luminosity, Multiply, Negation, Normal, Overlay, Pin Light, Reflect, Saturation, Screen, Soft Light, Src, Subtract, and Vivid Light. The default is Alpha. |
Blend Amount |
A Float attribute that controls the intensity of the blending. Only valid for additive and subtractive modes. The value ranges from 0 (no effect) to 1 (full effect), with a default of 1. |
Offset X |
A Float attribute that specifies the X offset in percentage for rendering the second image. The value ranges from -100 to 100, with a default of 0. |
Offset Y |
A Float attribute that specifies the Y offset in percentage for rendering the second image. The value ranges from -100 to 100, with a default of 0. |
Width |
A Float attribute that sets the width of the second image in percentage. The value ranges from 0 to 100, with a default of 100. |
Height |
A Float attribute that sets the height of the second image in percentage. The value ranges from 0 to 100, with a default of 100. |
Input |
Description |
|---|---|
Color Input 1 |
The primary RGBImage input for the first image. |
Color Input 2 |
The secondary RGBImage input for the second image. |
Output |
Description |
|---|---|
Color Output |
The RGBImage output of the merged result. |
Outline
The Outline Node generates an outline effect around objects.
Field |
Description |
|---|---|
Name |
A String attribute specifying the name of the node for reference. |
Enabled |
A Boolean attribute to enable or disable the outline effect. |
Edge Strength |
A Float attribute to adjust the intensity of the outline edges. Ranges from 0.0 to 10.0, with a default of 1.0. |
Edge Width |
A Float attribute to control the thickness of the outline. Ranges from 0.1 to 5.0, with a default of 1.0. |
Visible Edge Color |
A Vector3d attribute defining the RGB color for visible edges. Default is (255, 0, 0) (red). |
Blending Mode |
An Enum attribute for selecting the blending mode. Options include Add, Alpha, Average, Color, Color Burn, Color Dodge, Darken, Difference, Divide, Exclusion, Hard Light, Hard Mix, Hue, Invert, Invert RGB, Lighten, Linear Burn, Linear Dodge, Linear Light, Luminosity, Multiply, Negation, Normal, Overlay, Pin Light, Reflect, Saturation, Screen, Soft Light, Set, Src, Subtract, and Vivid Light. Default is Overlay. |
Opacity |
A Float attribute for controlling the opacity of the outline. Ranges from 0 to 1, with a default of 0.25. |
Input |
Description |
|---|---|
Color Input |
The primary RGBImage input for the color source. |
Depth Comparison Input |
A RGBImage input providing depth information for edge detection. |
Output |
Description |
|---|---|
Color Output |
The RGBImage output with the applied outline effect. |
Output
The Output Node is used to render the final image with customizable dimensions. It receives a color input and outputs it as the final result, allowing control over the desired width and height of the output. Note that only a single output node is allowed per composition.
Field |
Description |
|---|---|
Name |
A String attribute specifying the name of the output node. Default is Output. |
Desired Width |
An Integer attribute defining the desired width of the output image. Must be at least 1. Default is 256. |
Desired Height |
An Integer attribute defining the desired height of the output image. Must be at least 1. Default is 256. |
Input |
Description |
|---|---|
Color Input |
The RGBImage input for the color source to be rendered as the final output. |
Pixelation
The Pixelation effect gives a retro and blocky aesthetic by reducing the image resolution to a grid of larger and uniform pixels. The effect aims to mimic the appearance of old-school vintage graphics.
Field |
Description |
|---|---|
Name |
A String attribute specifying the name of the pixelation node. |
Enabled |
A Boolean attribute to enable or disable the pixelation effect. |
Granularity |
A float attribute defining the size of the pixelation grid. Higher values result in larger pixels, while lower values preserve more detail. Range: 0 to 100. Default is 10.0. Includes a slider widget for easy adjustment. |
Input |
Description |
|---|---|
Color Input |
An RGBImage input that receives the image to be processed by the Kawase Blur algorithm. |
Output |
Description |
|---|---|
Color Output |
An RGBImage output providing the node result. |
Radial Blur
The Radial Blur Node creates a radial blur effect, radiating from a specified center point.
Field |
Description |
|---|---|
Name |
A String attribute specifying the name of the node for reference. |
Enabled |
A Boolean attribute to enable or disable the radial blur effect. |
Amount |
A Float attribute that controls the intensity of the radial blur effect. The value ranges from 0 (no blur) to 10 (maximum blur), with a default of 1. |
Center |
A Vector2d attribute specifying the origin point of the radial blur as a percentage of the image dimensions. The default is (0.5, 0.5), which is the center of the image. |
Input |
Description |
|---|---|
Color Input |
The RGBImage input for the source image on which the radial blur effect is applied. |
Output |
Description |
|---|---|
Color Output |
The RGBImage output of the image with the applied radial blur effect. |
Scanline
The Scanline effect replicates the look of retro CRT displays by overlaying thin horizontal lines across the rendered image. This effect evokes a nostalgic aesthetic and can be customized to suit a variety of retro-futuristic or artistic styles.
Field |
Description |
|---|---|
Name |
A String attribute specifying the name of the node. |
Enabled |
A Boolean attribute to enable or disable the scanline effect. |
Density |
A float attribute controlling the density of the scanlines. Higher values result in more closely spaced lines. Range: 0 to 1. Default is 0.5. Includes a slider widget for adjustment. |
Scroll Speed |
A float attribute specifying the speed at which the scanlines scroll. Positive values scroll downwards, while negative values scroll upwards. |
Input |
Description |
|---|---|
Color Input |
An RGBImage input that receives the image to be processed by the Kawase Blur algorithm. |
Output |
Description |
|---|---|
Color Output |
An RGBImage output providing the node result. |
Sepia
The Sepia Node applies a sepia-toned effect to the input image, giving it a brownish tint. This effect is useful for achieving a vintage aesthetic or enhancing mood in a scene.
Field |
Description |
|---|---|
Name |
A String attribute specifying the name of the node for reference. |
Enabled |
A Boolean attribute to enable the effect on or off. |
Blending Mode |
An Enum attribute that determines how the sepia effect blends with the input image. Default value is Normal. |
Opacity |
A Float attribute that controls the intensity of the sepia effect. The value ranges from 0 (no effect) to 1 (full sepia application). |
Input |
Description |
|---|---|
Color Input |
An RGBImage input that receives the image to be processed by the Sepia node. |
Output |
Description |
|---|---|
Color Output |
An RGBImage output providing the sepia-toned image result. |
Shockwave
The Shockwave Node creates expanding circular wave distortion that emanate from an user defined point. This effect simulates a shock, useful for explosions, impacts, or scifi-like energy pulse effects.
Field |
Description |
|---|---|
Name |
A String attribute specifying the name of the node for reference. |
Enabled |
A Boolean attribute that toggles the effect on or off. |
Continuous |
A Boolean attribute that determines whether new shockwaves will emit immediately after the previous one ends. Default is true. |
Delay |
A Float attribute that sets the waiting time between shockwave emissions. Minimum value is 0. Default is 1.0. Only applies when Continuous is set to false. |
Amount |
An Integer attribute defining the number of shockwaves to emit. Minimum value is 0. Default is 5. Only applies when Continuous is set to false. |
Center |
A Vector3d attribute specifying the center point in world coordinates from which the shockwave effect originates. Default is (0.0, 0.0, 0.0). |
Size |
A Float attribute controlling the overall size of the effect. Range is from 0.001 to 100, with a default of 1.0. |
Speed |
A Float attribute determining how quickly the shockwave expands. Range is from 0.001 to 100, with a default of 2.0. |
Radius |
A Float attribute affecting the inner radius of the wave distortion. Range is from -10 to 10, with a default of -0.2. |
Maximum Radius |
A Float attribute setting the outer boundary limit for the wave effect. Range is from 0 to 10, with a default of 0.2. |
Wave Size |
A Float attribute controlling the thickness or prominence of the wave. Range is from 1 to 100, with a default of 10.0. |
Amplitude |
A Float attribute determining the strength of the distortion. Range is from 0 to 10, with a default of 0.05. |
Blending Mode |
An Enum attribute that specifies how the effect blends with the underlying image. Options include various modes such as “Add,” “Alpha,” “Multiply,” etc. Default is “Overlay”. |
Opacity |
A Float attribute controlling the transparency of the effect. Range is from 0 (transparent) to 1 (opaque), with a default of 0.25. |
Enable Debug |
A Boolean attribute that enables debug visualization for the effect. Useful when tweaking around. Default is false. |
Input |
Description |
|---|---|
Color Input |
An RGBImage input that receives the image to be processed by the Shockwave node. |
Camera Input |
An Attribute input that receives camera information for proper procesing of the effect. |
Output |
Description |
|---|---|
Color Output |
An RGBImage output providing the image with the applied shockwave effect. |
SSAO
The SSAO (Screen Space Ambient Occlusion) Node calculates ambient occlusion in screen space, enhancing depth perception by shading crevices and contact areas where light would be naturally occluded.
To properly integrate SSAO into a scene, you need a merge node that combines SSAO with the scene color. The chosen blending mode determines how SSAO affects the final image. The SSAO effect works by darkening occluded areas. For this reason we reccomend a Multiply blending mode for accurate results. With this blending mode, darker areas get darker and brigth areas stay the same. Otherwise, another good blending mode is Soft Light. This blending mode adjust brightness non-linearly resulting in lighten midtones, making the effect look softer. It is more subtle than Multiply but less physically accurate.
Field |
Description |
|---|---|
Name |
A String attribute specifying the name of the node for reference. |
Enabled |
A Boolean attribute to enable or disable the SSAO effect. |
Radius |
A Float attribute that defines the sampling radius for ambient occlusion. This controls the area around each pixel that is considered for occlusion calculations. The value ranges from 0.01 to higher values, with a default of 0.2. |
Samples |
An Integer attribute specifying the number of samples used for occlusion calculations. Higher values provide more accurate results but are more performance-intensive. The value ranges from 8 to 32, with a default of 8. |
Bias |
A Float attribute to reduce self-occlusion artifacts by offsetting the sampling position slightly. The value ranges from 0.001 upwards, with a default of 0.001. |
Intensity |
A Float attribute controlling the strength of the occlusion effect. Higher values create darker, more pronounced shadows. The value ranges from 0 upwards, with a default of 2. |
Max Distance |
A Float attribute that determines the maximum distance for occlusion checks. It helps limit the occlusion effect to nearby surfaces. The value ranges from 0.01 upwards, with a default of 0.07. |
Input |
Description |
|---|---|
Depth Input |
The depth map used to calculate occlusion based on the distance between pixels. |
Normal Input |
Provides surface normals for accurate occlusion direction. |
Camera Input |
Supplies camera parameters needed for depth and normal reconstruction. |
Output |
Description |
|---|---|
Color Output |
An RGBImage output providing the node result. |
Texture
The Texture Node allows you to apply textures to an input image. It is designed to enhance or modify the appearance of the input by layering textures.
Field |
Description |
|---|---|
Name |
A String attribute specifying the name of the node for reference. |
Enabled |
A Boolean attribute that controls whether the texture is applied. If set to true, the texture effect is active. Default is true. |
Input |
Description |
|---|---|
Color Input |
An RGBImage input that receives the image to be processed by the Texture node. |
Output |
Description |
|---|---|
Color Output |
An RGBImage output providing the node result. |
Tone Mapping
Tone Mapping is a process that adataps the contrast and color of an image to match the capabilities of a display device, such a computer monitor. This ensures that the visual content looks optimal and consistent across multiple devices.
Field |
Description |
|---|---|
Name |
A String attribute specifying the name of the node for reference. |
Enabled |
A Boolean attribute that controls whether the tone mapping effect is applied. |
Mode |
An Enum attribute to select the tone mapping mode. Options include: - LINEAR - REINHARD - REINHARD2 - REINHARD2_ADAPTIVE - UNCHARTED2 - ACES_FILMIC - AGX - NEUTRAL |
Luminance Map Width |
An Integer attribute defining the width of the luminance map. This must be a power of 2. Only applicable when Mode is set to REINHARD2_ADAPTIVE. Default is 256. |
Luminance Map Height |
An Integer attribute defining the height of the luminance map. This must be a power of 2. Only applicable when Mode is set to REINHARD2_ADAPTIVE. Default is 256. |
Maximum Luminance |
A Float attribute specifying the maximum luminance value. Controls how bright the brightest areas can be. Range: 0 to 20.0. Default is 4. |
Minimum Luminance |
A Float attribute specifying the minimum luminance value. Controls the darkest areas of the image. Range: 0 to 3.0. Default is 0.01. |
Average Luminance |
A Float attribute defining the average luminance used for tone mapping. Range: 0 to 1.0. Default is 1.0. |
Middle Grey |
A Float attribute that sets the middle grey value, influencing the overall brightness balance. Range: 0 to 1. Default is 0.6. |
Adaptation Rate |
A Float attribute controlling the speed of adaptation in dynamic scenes. A higher value results in faster adaptation. Default is 1. |
Input |
Description |
|---|---|
Color Input |
An RGBImage input that receives the image to be processed by the tone mapping node. |
Output |
Description |
|---|---|
Color Output |
An RGBImage output providing the processed image result. |
Currently, different modes of tone mapping are supported
Mode |
Description |
|---|---|
LINEAR |
No tone mapping, only exposure. |
REINHARD |
Simple Reinhard tone mapping. |
REINHARD2 |
Enhanced Reinhard tone mapping. |
REINHARD2_ADAPTIVE |
Adaptive Reinhard tone mapping. |
UNCHARTED2 |
Uncharted 2 cinematic tone mapping. |
CINEON |
Optimized filmic tone mapping. |
ACES_FILMIC |
ACES-compliant tone mapping. |
AGX |
Advanced filmic tone mapping. |
NEUTRAL |
Balanced and neutral tone mapping. |
Vignette
The Vignette Node applies a gradual darkening effect towards the corners of the image, creating a subtle focus on the center. This effect is commonly used to give images a vintage appearance or to draw the user’s attention.
Field |
Description |
|---|---|
Name |
A String attribute specifying the name of the node for reference. |
Enabled |
A Boolean attribute that controls whether the vignette effect is applied. |
Amount |
A Float attribute that controls the intensity of the vignette effect. The value ranges from 0 (no effect) to 1 (full effect), with a default of 0.4. |
Input |
Description |
|---|---|
Color Input |
An RGBImage input that receives the image to be processed by the Kawase Blur algorithm. |
Output |
Description |
|---|---|
Color Output |
An RGBImage output providing the node result. |
Additional Features
Render to Texture: Compositions can be used as inputs to a Material’s Albedo channel, enabling render to texture functionality. This allows for dynamic textures such as reflective surfaces or custom UI elements rendered in real-time.
Optional Use: Compositions are not mandatory. In scene settings, you can opt to render a single camera view directly without applying post-processing.
This flexible system empowers developers to create visually stunning and reusable post-processing setups tailored to their projects.